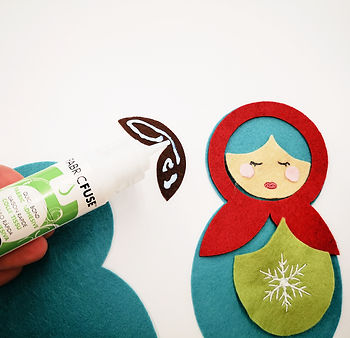
Matryoshka Doll Winter Ornaments
"It is what's INSIDE that counts!"

Hello, this is Jennifer Long of Bee Sew Inspired and as a professional doll designer, I am excited to be brining you this holiday stuffed ornament in doll form!!! I believe EVERYONE can create beautiful handmade items, which is why I try to give options in my patterns for the different styles of crafters. This tutorial is given for the hand embroidery version, but I also have included links for SVG cut files and/or digital embroidery machine version if that is your jam!

Why create handmade ornaments? Soo many reasons... they are beautiful, your can create them to your favorite color palettes and they are stitched with love! If you have never made a doll before, this is a PERFECT and simple project to you can begin with. I can't wait to get started creating together.

Beginner Friendly! These felt Matryoshka Winter Doll ornaments are simple and fun to create. Even the children in your life can even help!!! You will need about 1 hour per Doll to complete this project from start to finish!
What You Need:

Matryoshka Doll Pattern:
Your choice either:
Embroidery Threads in a variety of colors
Sewing needle
Applique and straight scissors
Freezer paper or tracing paper to transfer hand embroidery details
Small amount of Polyester Fiber Fill
Use the code "BEESEWINSPIRED" at Benzie Design checkout to receive 10% off your first Felt purchase!
Instructions:

1. Grab the Matryoshka Winter Doll Pattern designed by Bee Sew Inspired. You can choose between the Hand Embroidery or Machine Embroidery Versions:
a) Hand Embroidery PDF Pattern (which included PDF pattern, step sheet and optional SVG Cut files) If you are using a Cricut Maker to cut the felt shapes, make sure to use your rotary blade and set the fabric to felt.
b) Machine Embroidery Pattern (which includes all digital embroidery files and PDF Step Sheet).
Use code "BENZIEMAKES" to get the Hand Embroidery PDF for FREE at checkout! YAY!

2. Cut the following:
Doll Main Body: Cut 2 from Felt (front and back)
Face: Cut 1 from felt
Hair: Cut 1from felt
Tummy patch: Cut 1 from felt
Babushka Head Scarf: Cut 1 from felt
Optional: cut lips, eyes and cheeks (or this can be hand embroidered in the following steps.

3. Lay out the pieces and mark the face placement for the next step.

4. Applique Face Instructions: If you are appliqueing the face, use a small amount of Fabric Fuse Quick Bond Fabric Adhesive, and dab a bit of glue on the backside of the cheeks, lips, eyes. Press in place and let dry for 30 minutes.


4. Embroidery Face Instructions: If you are embroidering and face details, separate the embroidery floss into 3 strands. Using satin stitch, running stitch and back stitch embroider the face details.

5. Next trace one of the snowflake shapes onto freezer paper or tracing paper. Using the SpraynBond Pattern & Stencil Adhesive, tack the traced shape to the front of the cut out tummy patch.

6. Following the stencil, stitch through both layers. Gently tear away the freezer paper/tracing paper.

7. Next, arrange all the prepared pieces on the Matryoshka Doll front body. Using the Fabric Fuse Quick Bond Fabric Adhesive, line the back side of each piece with glue and then press in place. Let dry for 30 minutes. (Note: Do NOT glue the babushka on yet).

IMPORTANT: The babushka should be the LAST pieced to be glued on. Use it for placement to center the other pieces but do not glue it on till all the other pieces are tacked down as the babushka overlaps and covers some seams.

8. Using a coordinating color of thread and a blanket stitch, stitch down the edges of all the larger applique pieces. This gives some stability as well as finishes it with a beautiful and more traditional look.

9. Add hand embroidery elements as desired. French Knots to the flower, running stitches around the base. Be creative and have fun!!!

10. If you would like to hang your Matryoshka Doll from the tree or mantel, place a folded ribbon, lace or string at the top of her head and pin in place. Make sure the folded edge is towards her face and there is an overhang in the seam allowance. You will secure the ribbon in the final stitch out seam.

11. Cover with the second piece of body fabric and stitch in place using your sewing machine and a shorter stitch length. Make sure to leave an opening for turning. The hanging ribbon will be attached in this seam.

12. Using a sharp pair of small scissors, make little snips around the edges and cut away a triangle at the neck seam.

13. Gently turn the dolls using the opening. Stuff firmly with polyester fiber fill and hand stitch the opening closed with a ladder stitch.
Your Matryoshka Doll is now complete!
Use your Matryoshka Doll as a tree ornament, hanging from the mantel or a super sweet shelf sitter. Thank you for sewing along with me today!


If you would like to sew along with me, come watch the Matryoshka Tutorial on the Bee Sew Inspired YouTube Channel.
I am so happy you are here! Please take a moment to look around my site. You can sign up for either FREE newsletter (Doll Making or Quilting). Make sure you check out my other Tutorials HERE and come and be inspired!
Or, head over to the Bee Sew Inspired SHOP to see more of my Doll & Quilt Patterns.


Thank you for stopping by! Even though it is just July, I am going to hang my Matryoshka Winter Doll in front of my sewing room window!
Follow along for more inspiration:


