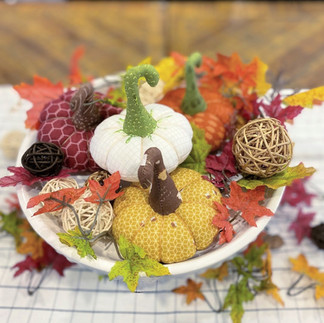
These little whimsical pumpkins are so fun to make!
You'll quickly become addicted to making them as we did!
Tutorial Submitted by Deborah Zaleski for Sew A Story


Make these little pumpkins into a pincushion or make many of them for a table center piece as part of your fall decor!

If you're a Maker's Club member you get download the PDF files.

Let's get creative! Just gather the supplies below, then download the pattern/files. Don't forget to share your project on social media using the hashtag #BSImakersclub and tag @sewastory_jenniferlong.

Tools
Fairytale Pumpkin Templates (Maker's Club Members)
Sewing Machine
Rotary Cutter
Quilting Ruler
Self-Healing Mat
Iron and Wool Mat
Scissors
Hand sewing needle
Turning tool (hemostat)
Water soluble fabric marker
Materials
5" x 10" of your favorite cotton fabric (we used some our favorites from the Country Life collection) for the pumpkin main fabric
4" x 8" of your favorite cotton fabric (we used some our favorites from the Country Life collection) for the pumpkin stem
5" x 10" HeatNbond Fusible Fleece
Embellishments
Embroidery floss in matching colors
Thread


If you haven’t already, become a Sew A Story - Maker's Club Annual Member. This gives you access to our entire growing, Maker's Club library of downloads! Including Quilt - Story Block of the Month patterns, Doll Patterns and Accessories (Sewing and Machine Embroidery versions), PDF templates, SVG cut files and more!

1. Download the Fairytale Pumpkin Pattern by Sew A Story. (Become a Maker's Club member today!)
2. Apply HeatNbond Fusible Fleece to the wrong side of the Main Pumpkin piece.
3. Cut 2 circle shapes for the Main Pumpkins and 2 Stem Shapes (mirror image).

3. With right sides together, using a 1/4" seam allowance to sew along the perimeter of the shapes. Leave an opening about 1.5" wide for the Main Pumpkin shape to be able to turn your work right side out. Sew the stem leaving the base of the stem open.

4. Clip corners and trim curves to get a nice smooth finish when turning right side out. Turn your work right side out using a hemostat or chop sticks.

5. BEFORE stuffing, fold the Main Pumpkin shape into quarters to find the center of the circle. Mark the center top and center bottom with a water soluble fabric marker.

6. Stuff both the Main Pumpkin shape and the Stem shape firmly using a hemostat or chop sticks. Make sure you get stuffing all the way to the tip of the stem.

8. Stitch the Main Pumpkin shape closed using a tight ladder stitch.

9. Using a long needle and 6 strands of floss, pierce the center of the Main Pumpkin shape wrapping the shape as you go. Keep the thread tight to create the texture you want.

10. Once you're happy with how your Main Pumpkin shape looks, tie the ends of the floss together. the ends of the thread will be tucked under the stem.

11. Pin the stem folding the edge 1/4" inward, us a tight ladder stitch to stitch the stem to the Main Pumpkin shape.

12. Embellish your mini pumpkin as desire. I used Deco Foil on this one and I think it turned out great!
We are here to help you explore your creativity with weekly inspiration, downloadable patterns, cut files and printable templates that make your craft life easier. We believe in the power of creativity to nurture the soul and to empower the next generation. Our designs are created with simplicity in mind and we always strive to provide you with the highest quality DIYs. Share what you’ve been up to with our Annual membership online community, or on social media by using the hashtag #BSImakersclub — your creativity is our biggest inspiration!
Membership gains you access to our full library of DIY projects complete with pattern downloads, tutorials, templates, embroidery files, SVG cut files and more! Head over to our membership page to see a full list of benefits. And be sure to follow us on Instagram, Facebook, and YouTube. We look forward to making this the most creative year of your life! Happy creating! ~ Jennifer Long


Download the
FAIRYTALE PUMPKIN
templates below.
Not a member? Join today!
Click the button below
Member's Download the Pattern below.
Member's can simply login at the top of the site to unlock the downloads below.
Did you like this project? Head over to the Maker's Club Tab and explore other patterns, projects and downloads. Note: Annual membership has FULL access to all the past patterns and projects in the Maker's Club. Monthly membership has access to monthly content inside the "HOME - Newest Downloads" tab.


