Teach, play and act out the heroes in your community with the It Takes a Village Felt Doll & Bag set! This sew along will walk you through cutting, stitching, and embellishing felt dolls, as well as stitching zippered truck pouches in which to carry the pieces.


Week 3: Make Zipper Bags
Week 3 is for making the bags. Watch the video, below, as I share tips for making pouches and adding zippers.
Needed Supplies:
•(1) It Takes a Village Felt Panel
Optional Supplies:
Fat Quarters for bag lining ( 2 per bag )
36” x 48” Basic, white craft felt
(3) 8“/9” or longer #5 nylon coil zipper
Embroidery Floss for embellishments
Heatnbond Sparkle Paste for embellishments
Hand sewing needle and thread
Zipper foot attachment
Turning tool or chopsticks
Instructions for Week 3
Fuse the wrong side of the Bag pieces with the Fusible Interfacing, taking care to follow the manufacturer’s directions for correctly fusing to the fabric. Note: Heat from a hot iron can melt the acrylic felt panel. If you choose to iron, make sure to do a TEST press on a scrap of panel felt fabric first.

2. Trace the bag piece shape onto (2) bag lining fat quarters. Cut on the traced lines.
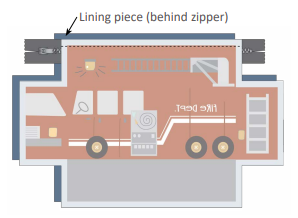
Gather (1) zipper, (2) prepared bag pieces, and (2) lining pieces. Place (1) bag piece and (1) lining piece together RST. Sandwich (1) long edge of the zipper between the two pieces with the zipper head facing the fabric. Sew the zipper in place. For best results, use your zipper foot attachment and sew as close to the zipper teeth as possible. Backstitch at the beginning and end for reinforcement.
Next, align the second bag piece and lining piece RST, then sandwich the opposite side of the zipper between the two fabrics. Use the already sewn side for placement, ensuring both ends align when the zipper is closed. Sew the second side of the zipper in place.
Finger press the entire seam allowance or CAREFULLY press with a cool iron.
Using a coordinating thread color, top stitch along both edges of the zipper to give the edges a nice, clean finish. Note: Using top and bottom thread colors that match the bag panel colors is recommended.
Using a tight zig zag stitch, stitch across the zipper teeth where the ends of the panel align to create a zipper stop. Repeat on the second side. Note: Make sure the zipper pull is located between zipper stops. Stitch carefully, as hitting the zipper teeth with the needle might cause the needle to break.

Open up the zipper halfway for turning. Trim excess zipper tape, leaving about 1/2 - 1
extra on each side. Note: If you do not open the zipper, you will not be able to turn the bag RSO.
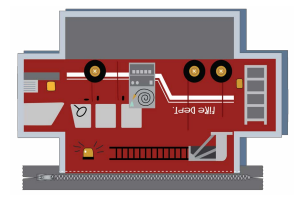
Align the bag panels RST and lining fabric RST, as shown below. Sew along the sides and bottom, leaving the corner cutouts unsewn on both pieces and an opening at the bottom of the lining only for turning. Backstitch at the beginning and end for reinforcement.
Finger press seams open to reduce bulk or CAREFULLY press with a cool iron.

Align (2) adjacent bottom corners by pinching out the corner and aligning the seam lines to create a box corner. Sew along the seam and be sure to backstitch at the beginning and end for reinforcement.
Repeat step 11 to box the remaining bottom corner of the bag panel and the (2) lining pieces.
For the (2) top corners, repeat step 11, making sure to sew the zipper tape ends into the corner seams.
Turn the bag RSO, using a turning tool or chopsticks to fully push out the top and bottom corners of the bag. Close the opening in the lining by hand or machine. Push the lining into the pouch.

Share on Social Media So We Can Cheer Each Other On!
Share your progress on social media using the hashtag #ittakesavillagepanel and TAG me with the "@" symbol @sewastory_jenniferlong, so I can cheer you on!
You can also click on the image to download this graphic! Then you can share on social media to let others know you're sewing along with the It Takes A Village Felt Panel Sew-Along.
Sew-Along Details
This SAL is fully supported, with tips and tricks and all the organization you will need to just relax and enjoy all the fun sewing. We'll share weekly blog posts, emails, social media posts, and videos to make sure you have everything you need to have success sewing the It Takes A Village Felt Panel. If you haven't already, sign up for SAL communication at the link below.
November 20 - Week 1: Preparation & Cutting
November 27 - Week 2: Make and Embellish Felt Dolls
December 4 - Week 3: Make Zipper Bags
December 11 - Week 4: Embellish Bags and Finish Project
Size: 36” x 69”
Techniques: Basic cutting, sewing, and hand-embroidery skills
Difficulty: Beginner
I can't wait to see your Little Witch Felt Panel projects! Thanks so much for sewing along with us!
-- Jennifer


Comments